How To Configure LVM
- easSylinux

- Feb 17, 2018
- 2 min read
Updated: Mar 6, 2018
What is LVM?
LVM is a method of allocating hard drive space into logical volumes that can be easily resized as per our requirement.
OR
LVM is a file management utility which allows us to create and manage the storage of a server like adding, removing and resizing partition on demand.
Below are the basic core term which are used in Logical Volume Manager :
1. Physical volume
2. Logical group
3. Logical volume
4. Physical extent
Scenario 1 :
We are taking simplest scenario to make good understanding about LVM. Many of us didn’t understand how the fundamentals exist behind LVM.
Basically We have provided raw disk to our machine. Using provided raw disk, we have to make partition using fdisk command utility. After making partition, we are able to make PV(Physical Volume), VG(Volume Group), and finally LV(Logical Volume).
Lets see the demonstration : “Welcome to Eassy Linux”
We are having 10 GB of Raw disk /dev/sdb :

NOTE : sda disk is used for system partition configuration.
#fdisk –l (list the disk available with system)

Now , Using this raw disk /dev/sdb, we are going to first make partition using fdisk utility :
#fdisk /dev/sdb
Now press n to create a new partition.
Press p to make primary partition.
It will ask for starting cylinder as it is raw disk we will use whole disk, so just simply press enter.
enter the last cylinder. Just simply press enter as we need to use the whole disk. The drive has been initialized and read to be formatted.
To check partition information by pressing p.
Below are the step snapshots:

Now after performing the above steps we can see here above partition type is LINUX (ID 83) so we need to change.
Now press t (toggle).
It will suggest to see the Hex codes list for different partition type. We have to choose 8e from the list.

After putting 8e Hex code for partition 1, its partition type has been changed.

Now press w to save the changes made to fdisk utility.
/dev/sdb partition is done now.
Now execute the below command to inform operating system kernel of partition table changes.
#partprobe /dev/sdb

Create the physical volume :
#pvcreate /dev/sdb1

Create the Volume group with the name eassylinux :
#vgcreate eassylinux /dev/sdb1

TO verify volume group is created or not we used vgs command.

Now as you can see, our logical group size is 10GB.
Create Logical volume with name data of size 4GB :
#lvcreate –L 4GB –n data eassylinux

Here
–L = size of lv.
-n = name of lv.
To verify use lvdisply , lvscan or lvs command.

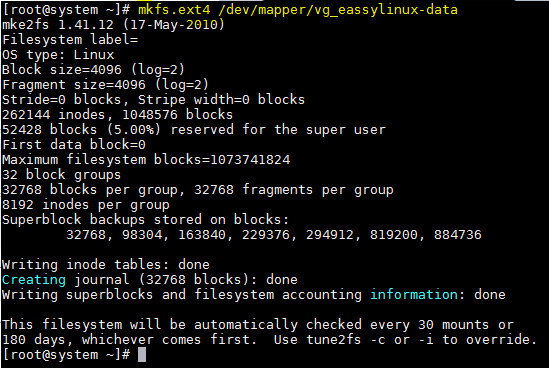
Now format the LVM partition :

Make a directory for mounting the LVM parttiton :
# mkdir /data
Now mount the partition:
Here We are mounting temporary

Verify the mount by df -h command :

Also verify with lost+found directory available inside the mount point. If exist , that means you have successfully configured the LVM.

Congratulations!!!!
We have configured the LVM partition.
In next scenarios, We will see how to make 3 logical volume with 1 PV and 1 VG.


Comments