
How to configure 2 node cluster with RHCS(Redhat Cluster Suite) and deploy Application.
- easSylinux

- Dec 31, 2017
- 6 min read
Here we are going to configure Apache Tomcat (System 1) and Mysql (System 2) in a two node RedHat Cluster Suite (RHCS) with high availability (HA) cluster, it will help to run any desire application and database on automatic switchover mode with zero downtime.
RHCS High availability clusters eliminate single point of failure, so if the any node in cluster on which a service (in our case Apache Tomcat and MySQL) are running on node 1 and Node 2 . If one of Node become inoperative, the service can start up again (fail over) to another cluster node with minimum interruption or without any data loss.
System Requirements
There are many different ways of setting up a high availability cluster. In our part, we are using following components:
1. Two Cluster nodes - Install two machines with RedHat Enterprise Linux
Server 6.3 to act as cluster nodes.
2. Network /Local Storage - Shared network storage or Local storage is required. In our case we will used additional 5GB storage on both node, one for Apache Tomcat and the other one MySQL server.
If our one node gets down, then same LUN will appears on another node with data availability.
3. RedHat Products - Combines components from RedHat Enterprise Linux and RedHat Cluster Suite.
4. We will use apache tomcat RPM .
We had two RHEL 6.3 installed OS with hostname system1.eassylinux.com and system2.eassylinux.com to create HA cluster. We have to disable selinux policy and flush iptables for this setup.
Configure IP Address for both the cluster node :

We have to disable , flush iptables and selinux policy for this setup.


We changes the SELINUX policy from configuration file /etc/sysconfig/selinux,
Now system comes to know that selinux policy is disabled, we have to reboot both nodes.
Now you can see , selinux policy is in disabled state.

Make host entry in /etc/hosts file to communicate each node with their hostname and their ip address:

Now check the communication between both nodes via hostname

We are successfully able to ping our both node with their hostname and IP address vice versa.
Configure block storage:
We want two additional LUN locally for Apache tomcat and Mysql.
Hence we are adding 5GB additional disk on each node for apache tomcat and mysql on both node. Then we will make logical volume for our data storage.
As per below image we have successfully added 5 GB local LUN on both node.

We added successfully 5GB disk named sdb and sdc. Now we are going to create LVM partition.
Create LVM Partition:
Create the logical volumes and file systems using standard LVM2 and file
System commands. This example assumes a whole second disk (/dev/sdb and /dev/sdc) is being used as a new LVM physical volume. Here we use fdisk to create the LVM (8e) partition type and run partprobe to make sure the change is synced with the kernel:
LUN partition configuration:
Now we are going to create partition for /dev/sdb on both nodes.
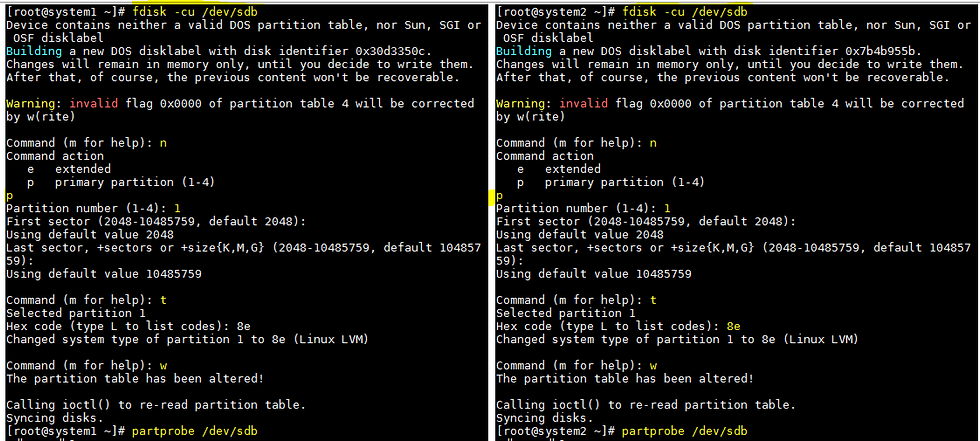
Similarly, we are going to create partition for /dev/sdc on both nodes.

We have created the partition name /dev/sdb1 and /dev/sdc1 from disk /dev/sdb and /dev/sdc .

Create the LVM physical volume :

Create the LVM volume group:

Create the logical volume from the new LVM volume group for Tomcat and
MySQL on both nodes:

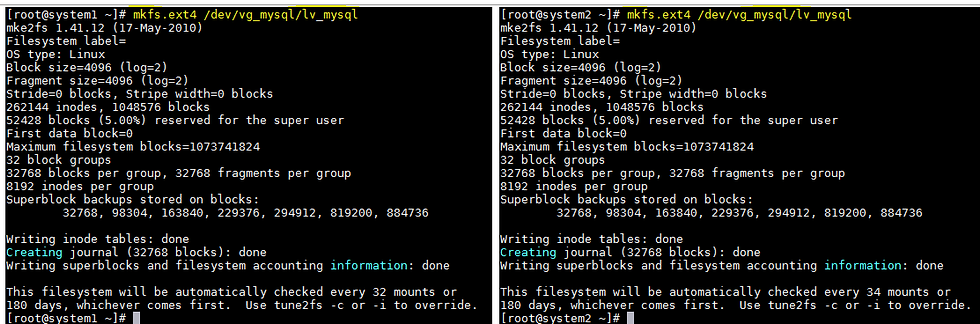
Now format a block storage device with a specific file system on both nodes,
[root@system1 ~]# mkfs.ext4 /dev/vg_tomcat/lv_tomcat
[root@system2 ~]# mkfs.ext4 /dev/vg_tomcat/lv_tomcat

[root@system1 ~]# mkfs.ext4 /dev/vg_mysql/lv_mysql
[root@system2 ~]# mkfs.ext4 /dev/vg_mysql/lv_mysql
We have now two partitions, with device names /dev/vg_tomcat/lv_tomcat and /dev/vg_sql/lv_sql.
Create two directory where we can mount new two partitions :
[root@system1 ~]# mkdir -p /tomcat
[root@system1 ~]# mkdir -p /mysql
[root@system1 ~]# mount /dev/vg_tomcat/lv_tomcat /tomcat/
Here now logical volume is mounted on /tomcat dir.
[root@system2 ~]# mkdir -p /tomcat
[root@system2 ~]# mkdir -p /mysql
[root@system2 ~]# mount /dev/vg_mysql/lv_mysql /mysql/
Here now logical volume is mounted on /mysql dir.

On system1, we mounted the /tomcat directory and on system2, we mounted the /mysql directory.

We have to mount iso image and create repository to install cluster components.

Now We have mounted the iso image to /mnt .
We are created the yum repository in /etc/yum.repos.d/server.repo as below :

To check repository is enabled, fire the command yum repolist all as below :

Install Apache Tomcat :
On both cluster nodes, install the Apache tomcat RPM.and start the tomcat service on only one node.
#rpm –ivh apache-tomcat*
#/etc/init.d/apache-tomcat start
Install MySQL :
On both cluster nodes, install the MySQL RPM. and start the MySQL service on only one node.
#rpm –ivh MySQL-*
#/etc/init.d/mysql start
Install RICCI :
On both cluster nodes, install the ricci RPM.
Install the ricci RPMs:
# yum install ricci –y
Start RICCI :
On both cluster nodes, start the ricci daemon on both nodes and configure it
to start on boot:
# service ricci start
# chkconfig ricci on

Set password
On both cluster nodes, set the ricci user password:
# passwd ricci
At this point both cluster nodes should be running the ricci servers and be
ready to manage by the cluster web user interface (luci)

Install The Cluster Web User Interface (LUCI)
On the system1, we have chosen to run the cluster web user interface (luci), then run the following steps to install and configure luci:
Install Luci :
Install the luci RPMs:
# yum install luci –y
Start Luci :
Start the luci daemon.
# service luci start
#chkconfig luci on
#service luci status

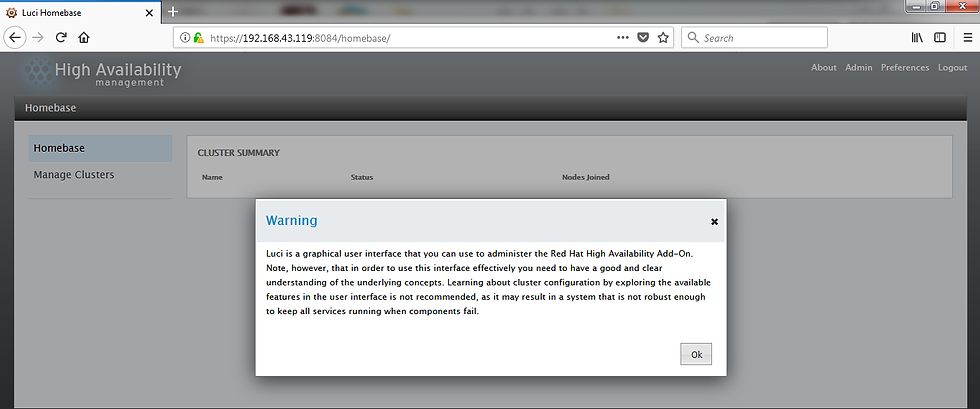
Login to Luci :
As instructed by the start-up script, point your web browser to the address
displayed while restarting the luci service and login as the root user, as
prompted.

This is High Availability management home page.

Login creadential will be your root and root password. After enter creadential, you will see this page.
Name the cluster:
Select Manage Cluster then Create, then fill in the Cluster Name (for example,
eassy_linux).
Identify cluster nodes:
Fill in the Node Name (short name as mentioned in /etc/hosts file) and
Password (the password for the user ricci) for the first cluster node. Click the
Add Another Node button and add the same information for the second cluster
Node.

Add cluster options:
Select the following options, then click the Create Cluster button:
Use the Same Password for All Nodes: Select this check box.
Use Locally Installed Packages: Select this check box.
Reboot Nodes Before Joining Cluster: Leave this unchecked.
Enabled Shared Storage Support: Leave this unchecked.
After you click the Create Cluster button, if the nodes can be contacted luci
Will set up each cluster node and add each node to the cluster. When each
Node is setup, the High Availability Management screen will appear.

Create fail over domain :
Click the Failover Domains tab. Click the Add button and fill in the following
information as prompted:
Name : Fill in any node you like. (e.g. failover_eassylinux)
Prioritized : Check this box.
Restricted : Leave this unchecked.
Member : Click the Member Box for each node.
Priority. Add a “1” for system1; Add a “2” for system2 under the priority column.
Click Create to apply the changes to the fail over domain.
The configuration screen will look like this:

Add fence devices :
Configure appropriate fence devices for the hardware you have. Add a fence
device and instance for each node. These settings will be particular to your
hardware and software configuration.
Creating a Highly Available LVM (HA LVM) :
We have created two LVM eg. Lv_tomcat and lv_mysql on both node.
The HA LVM provides LVM failover by:
Providing a mirroring mechanism between two SAN connected systems
Allowing a system to take over serving content from a system that fails
Setting up Shared Resources (From LUCI) :
Select the Resource tab. We are adding 3 Resource type
1.IP Address for apache-tomcat and mysql , use virtual ip, because we never use physical ip. If we use physical ip co-incidently our physical ip is down due to some network issue, then our HA service will be down until we get up our physical server. Hence we always use virtual ip.
Identify the Cluster Service's IP Address :
From luci, do the following to identify the cluster service's IP Address:
Select the Cluster.
Click on the cluster name (for example, Eassy_Linux).
Add an IP address resource.
Select the Resources tab, the click Add and choose IP Address.
Fill an IP address information.
Enter the following:
IP Address. Fill in a valid IP address. Ultimately, this IP Address
(192.168.43.121 for Apache Tomcat & 192.168.43.122 for MySQL) is used from a
Web browser to access the Tomcat and MySQL.
Monitor Link. Check this box.
Submit information.
Click the Submit button.
After configuring this, the screen will look like:


2.Filesystem


3.Scripts


Similarly for MySQL :
IP Address :

Filesystem :

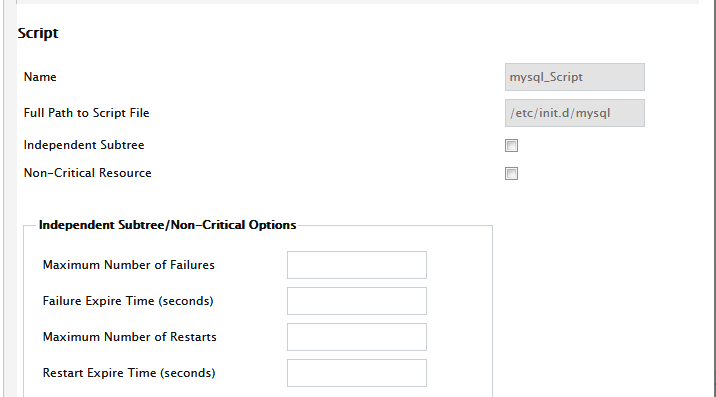
Script:

Service groups :
Creating MySQL and Tomcat Service :
From luci, with the cluster selected, add a new service and associate the IP Address to it as follows:
Add a Service Group :
Click on the Service Groups tab and select Add.
Fill in the service group information.
Service name. Assign a name to the service (e.g. mysql and
apache-tomcat)
Automatically start this service. Check this box.
Failover Domain. Select the failover_easylinux you created
earlier.
Recovery Policy. Select Relocate.

Add the IP address resource :
Select the Add Resource button from bottom.
Then select the IP Address you added earlier.
Add File System as a Global Resource for MySQL and Tomcat
which you have added before.
Add Service as a Global Resource for MySQL and Tomcat which
you have added before.
Now, Submit the information.
The screen will prompt as:

Filesystem for Apache_Tomcat

Script for Apache_Tomcat

And click the submit button. You have successfully created Apache_Tomcat cluster Service.

Just like Apache_Tomcat cluster services created, similarly we have to create for MySQL.

IP address for MySQL cluster service :

Filesystem for MySQL cluster services :

Script for MySQL cluster services :
And click the submit button. You have successfully created MySQL cluster Service.

Finally we have successfully establish HA cluster running with Apache tomcat and mysql

We can check through command line:

Below image is of your tomcat application running on virtual ip :

After cluster running properly, you can see you both LUN are running on node1.

You are also able to login to mysql on node1.


Comments